We have a built in calendar inside your Connect My Leads CRM so that you can automate having your clients book in with you for a meeting. In today's training, we are going to show you how to integrate your Google My Business page with the CRM, how to create your calendar inside the CRM, and then how to apply that inside your campaigns.
INTEGRATING YOUR GOOGLE MY BUSINESS PAGE
First, we need to integrate your Google My Business page into the CRM so we can add in your Google calendar.
After logging into the software, go to the navigation bar on the left hand side and select Settings. Once you're inside, click on the Integrations tab at the top.

Inside Integrations, you will need to connect your Google page. You will be taken back to the Integrations page once your Google account has been successfully connected.
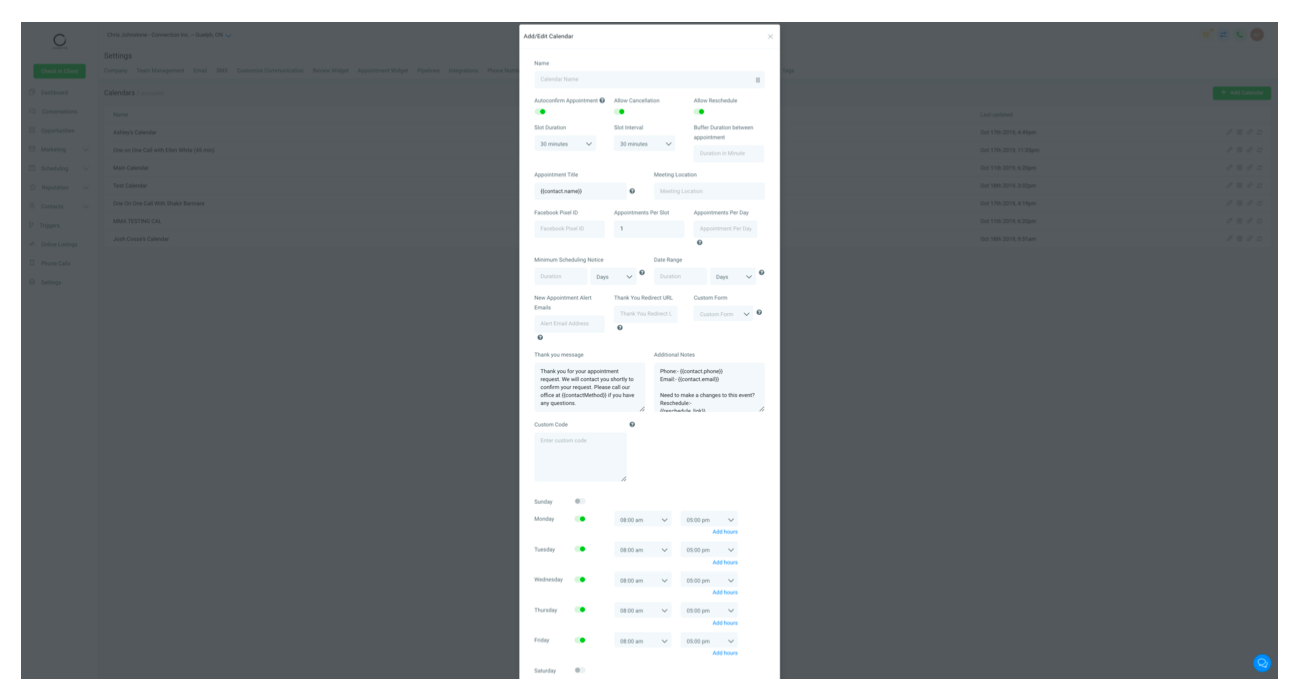
BUILDING YOUR CALENDAR
You should still be inside the Settings tab in the software. Go to the top of the page and click on Calendars.
In the upper right hand-side, find the green button that says "Add Calendar' to create your first calendar.

We have made it so that you are able to fully customize when people can book in with you, how long they can book in with you for, how many appointments do you want to have per day, how long in between appointments to you want to give yourself before your next appointment, etc.
You can create as many calendars as you would like within the software.
Example Calendars:
Phone Appointment - 30 minutes
Phone Appointment - 60 minutes
In Person Meeting - 45 minutes
APPLYING YOUR CALENDAR TO YOUR CAMPAIGN
You are able to add in your calendar link inside any SMS and email that you send out within a campaign. There are several ways you are able to do this.
The first is to grab the URL link directly from the Settings > Integrations > Calendars tab. On the far right hand side, there is a link URL you can copy and paste into any campaign. If you're adding it to an email sequence, you can highlight over the words "Click here to book an appointment with me" and the hyperlink that with your calendar link.
You can also add in the custom field {{calendar.name}} or {{user.calendar_link}} by clicking on Custom Value.
You can also set up a Trigger Link by going to Campaign > Trigger Links. Click on the green Add Link button in the upper right hand corner, name that Trigger Link and add in the URL to the calendar.

Once you have created a Trigger Link, inside the SMS sequence, click on the Trigger Link option and select the one you want to use.
You can also copy and paste this Trigger Link into your email sequence.

When you start booking people into your calendar from the software, you can click on Scheduling in the navigation bar and view your calendar and view the appointments you have scheduled.
Inside the appointments tab, you can update the status of that appointment on whether they showed or not.
